


Press play to start listening
Can You Dual Boot Android and Windows?
You should know that Android is a mobile operating system designed primarily for smartphones and tablets. These devices usually use ARM chips while Windows PCs usually use x86 chips.
There are technical barriers between the two kinds of devices and therefore software designed for ARM chips can’t run on x86 chips without adjustments and vice versa.
To install Android on a PC, you need to choose an Android OS especially modified to run on PCs. Android x86 is such an Android OS for PC. In addition, it is an open-source project. With it, you can get key features and an interface the same as those of a real Android smartphone.
Why Do You Need to Dual Boot Android and Windows?
Some people may just want to try Android on the PC or run Android apps on the PC. In this case, they can install Android on VirtualBox. This method is simple and safe, but the downside is that it will consume more resources because you need to run both Windows and Android systems.
Android is a lightweight OS. It can invigorate old and low-configuration PCs. If your PC is old or has a low configuration, you can replace Windows with Android completely to invigorate it. But if this is the first time that you try Android on a PC, I recommend you dual boot Android and Windows first.
Dual-booting Android and Windows can check whether you can get used to this system and whether your PC can run this system.
How to Dual Boot Android and Windows
To dual boot Android and Windows, follow the steps below:
Step 1:
Download the Android x86 ISO file from its official website. Please choose the 32-bit or 64-bit ISO file that can be installed on Windows PC directly. The reason why I recommend this OS to you is that it has the following features:
- It can run on 32-bit/64-bit AMD and Intel processors.
- It supports both BIOS and UEFI boot modes.
- It can boot from FAT32, EXT4, and NTFS partitions.
Step 2:
Burn this ISO file into a USB drive using Rufus or other burning software. If you use Rufus, the process is as follows:
- Insert a USB drive into your PC.
- Download Rufus and launch it. The USB drive will be detected automatically.
- Click the Select button to select the Android x86 ISO file.
- Choose MBR or GPT as the partition scheme, according to the partition scheme the target disk use.
- Click the Start button. Some windows may pop up and you just click the Yes and OK buttons.

Step 3:
Move/resize partitions using MiniTool Partition Wizard to create enough space for Android. This tool allows you to get unallocated space from multiple partitions. The process is as follows:
- Launch MiniTool Partition Wizard and go to its main interface. Right-click a partition and choose Move/Resize.
- Drag the arrow icon to decide how much space you want to shrink, click the partition block and drag it to decide the location of the partition, and then click the OK button.
- In the same way, you can take unallocated space from multiple partitions and then put the unallocated space together.
- Right-click the unallocated space and choose the Create button.
- Follow the on-screen instructions to create an NTFS, FAT32, or EXT4 partition. Because you are dual-booting Android and Windows, an NTFS partition is recommended. Therefore, you can keep all parameters to the default value.
- Click the Apply button to execute pending operations.
Step 4:
Start dual-booting Android and Windows.
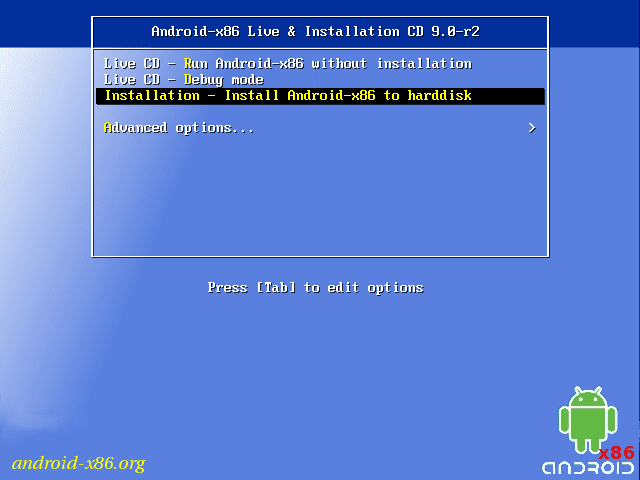
- Insert the USB installation disk into the PC and boot the PC from the USB drive.
- After the Android x86 installation wizard opens, please select Installation – Install Android-x86 to hard disk.
- On the new window, choose the new partition you just created to install Android-x86.
- In the next window, choose the “Do not re-format” option because you have formatted the partition to NTFS in the above steps.
- It will ask you some questions related to GRUB, /system directory, etc. Please select OK for all of these questions.
- After the installation process is completed, select Run Android-x86 to boot into it. Wait until you get into the GUI.

Bottom Line
MiniTool Partition Wizard is a powerful and reliable disk and partition management tool. It can help you create, format, split, merge, copy, and delete partitions; clone system and disk, recover partitions and data, etc.
When you want to dual boot Android and Windows, you need to manage partitions. In this case, you can use MiniTool Partition Wizard for free.
